It all started with a craving for those irresistible chicken tenders I used to devour at my favorite local diner. You know the kind—crispy on the outside, juicy on the inside, and seasoned to perfection. I couldn’t shake the thought of duplicating that flavor explosion at home, not just for my taste buds but also for my wallet! Who doesn’t love a good homemade version that’s both delicious and budget-friendly? So, I set out on a mission to create my own Crack Chicken Tenders.
Let me tell you, the journey was far from straightforward. After what felt like a culinary marathon of six attempts (yes, six!), I finally nailed it down. Each round was a mix of triumphs and epic fails—some batches were too dry, while others were just plain bland. I was determined to get that perfect balance of crispy exterior and mouthwatering juiciness, giving me countless moments of frustration in the kitchen. But hey, every failed attempt taught me something new about seasoning and technique!
And boy, was it worth every minute spent experimenting! The final result is a plateful of Crack Chicken Tenders that are nothing short of magical—golden-brown crusts that shatter delightfully with each bite and succulent chicken that practically melts in your mouth. These tenders are packed with flavor, easy to whip up for a quick meal or snack, and they even hold up well if you have leftovers (which is rare in my house!). I can’t wait for you to try them; trust me, once you do, you’ll be making these again and again!
These Crack Chicken Tenders are….
….the ultimate fusion of flavor and texture that will leave you craving more!
1. They deliver an explosive flavor thanks to the ranch seasoning mix, which infuses each bite with a zesty kick. This seasoning blend not only enhances the chicken but also complements the cheesy goodness from the shredded cheddar, creating a taste sensation that’s hard to resist.
2. Irresistibly crunchy exterior – the combination of panko breadcrumbs and cheddar cheese creates a perfectly crisp coating that contrasts beautifully with the juicy chicken inside. This texture is achieved through an even coating of the wet mixture, ensuring every tender is enveloped in that satisfying crunch.
3. The methodical dredging technique elevates these tenders beyond ordinary versions. By using a wet mixture of eggs and milk to bind the coating, I found that it ensures the panko adheres firmly, resulting in a delightful crunch that holds up even after baking.
4. Incredible value – making these Crack Chicken Tenders at home is not only cost-effective but also allows you to customize ingredients to your liking. With just a pound of chicken and a few pantry staples, you can whip up a fantastic meal or snack that rivals restaurant offerings without breaking the bank.
PS These tenders yield about 4 servings, making them perfect for sharing (or keeping all to yourself!). Enjoy them fresh out of the oven for maximum crunch!
Ingredients for the Crack Chicken Tenders
Each ingredient in this dish plays an essential role in flavor and texture. Here’s what you’ll need:
1 pound chicken tenders: The star of the show, providing tender and juicy meat.
1 cup panko breadcrumbs: Adds a delightful crunch to each bite.
1 cup shredded cheddar cheese: Melts beautifully, offering rich and cheesy goodness.
1 packet ranch seasoning mix: Infuses the tenders with zesty and savory flavors.
2 large eggs: Binds the coating together for a perfect cling.
1/4 cup milk: Keeps the mixture moist and enhances the coating’s texture.
- 2 tablespoons olive oil: Helps achieve a golden-brown crispiness when baked.
Don’t Skip the Egg Dip! It’s Essential!
I get it—dipping chicken tenders in egg and milk may seem like an extra step you can skip. I thought I could just coat them straight in the breadcrumbs and save some time. But trust me, after several attempts, I learned that skipping this crucial step is a recipe for disaster—not only in taste but also in texture.
The egg dip acts as a glue that holds all those delicious panko breadcrumbs, cheddar cheese, and ranch seasoning to the chicken tenders. Imagine trying to build a sandcastle without water; it would crumble! Without the egg wash, your crispy coating will flake off during baking, leaving you with sad, naked chicken tenders instead of perfectly crunchy bites.
What does the egg dip do?
- Improves adhesion — The egg mixture creates a sticky layer that ensures the coating clings firmly to each chicken tender during baking.
- Enhances moisture retention — The egg and milk combo locks in moisture, preventing the chicken from drying out and keeping it juicy inside.
- Boosts flavor — The richness from the eggs adds depth to the overall flavor profile of the tenders, making every bite more satisfying.
- Creates a golden crust — The proteins in the egg help achieve that beautiful golden-brown color as they caramelize in the oven.
- Adds crispiness — When combined with panko breadcrumbs, the egg dip contributes to an ultra-crispy texture that makes these tenders irresistibly crunchy.
Different egg dip times
- Just a quick dip (good) — A fast dip will work but may result in uneven coating and less crispiness.
- ⭐️ 30 seconds to 1 minute⭐️ — Optimal time for ensuring even coverage and good adhesion without overwhelming sogginess.
- ⭐️ Over 1 minute⭐️ — While still effective, prolonged soaking can lead to excess moisture that may affect crispness.
Beware! The most common mistake is not allowing excess egg to drip off before coating with breadcrumbs. If you skip this step or rush it, you’ll end up with soggy chicken tenders instead of crispy perfection. Don’t let that happen!
How to make Crack Chicken Tenders

Are you ready to see how straightforward it is to make the Crack Chicken Tenders of your dreams??
1. PREPARE THE OVEN AND COATING
Let’s start by getting everything ready for those mouthwatering tenders!
Bold Action Label: Preheat – Preheat your oven to 400°F (200°C). This will ensure that your chicken tenders cook evenly and achieve that perfect crispiness. While the oven heats up, line a baking sheet with parchment paper to prevent sticking and make cleanup a breeze.
Bold Action Label: Mix – In a mixing bowl, combine the panko breadcrumbs, shredded cheddar cheese, and ranch seasoning mix. This mixture is the secret to achieving a crunchy, flavorful coating that will elevate your chicken tenders!
HANDY TIPS
- Use fresh panko breadcrumbs for an even crunchier texture; they absorb less moisture than traditional breadcrumbs.
- Feel free to experiment with different cheeses like mozzarella or pepper jack for added flavor!
2. PREPARE THE CHICKEN
Now it’s time to coat those chicken tenders in some deliciousness!
Bold Action Label: Whisk – In another bowl, whisk together the beaten eggs and milk. This wet mixture will help the breadcrumb coating stick beautifully to the chicken.
Bold Action Label: Dip and Coat – Dip each chicken tender into the egg mixture, allowing any excess to drip off before coating it in the breadcrumb mixture. Make sure each piece is thoroughly covered; this is crucial for achieving that golden-brown crust!
HANDY TIPS
- For extra flavor, let the coated chicken sit for a few minutes before baking; this helps the coating adhere better.
- If you want an even crispier finish, consider double-dipping: dip in egg, coat with breadcrumbs, then repeat!
3. BAKE THE CHICKEN TENDERS
It’s almost time to enjoy your delicious creation—let’s get these tenders baking!
Bold Action Label: Arrange – Place the coated chicken tenders on the prepared baking sheet in a single layer. Drizzle them lightly with olive oil—this step adds flavor and helps achieve that beautiful golden color.
Bold Action Label: Bake – Bake in the preheated oven for 20 minutes, or until the chicken is cooked through and the coating is golden brown. To ensure they’re perfectly done, use a meat thermometer to check that the internal temperature of the chicken reaches 165°F (75°C)—this keeps them juicy inside while remaining crispy outside!
HANDY TIPS
- If cooking in batches, keep cooked tenders warm in a low oven (around 200°F/95°C) while you finish baking others.
- If you prefer deeper color, switch on the broiler for an additional minute at the end—watch closely so they don’t burn!
4. SERVE
The best part is here—time to dig into those succulent tenders!
Bold Action Label: Cool and Serve – Remove from the oven and let cool for a few minutes before serving. This allows them to firm up slightly, making them easier to handle.
Bold Action Label: Enjoy! – Dive into these amazing chicken tenders with your favorite dipping sauce! Whether it’s ranch, honey mustard, or BBQ, you can’t go wrong.
Make these once, and I wager they will invade your dreams every night too! – Nagi x
FAQ – Crack Chicken Tenders
🍗 How long will these chicken tenders stay fresh in the fridge?
Cooked Crack Chicken Tenders can be stored in the fridge for about 3 to 4 days. After that, they start losing their appeal, with taste and texture diminishing significantly—around 80% as good by day three and only 65% on day four. To maintain freshness, make sure to store them in an airtight container. If you’re not planning to eat them within that timeframe, consider freezing them instead!
⏳ Can I skip letting the chicken tenders rest after baking?
Nope, you really shouldn’t skip this step! Letting the chicken tenders rest for about 5 minutes after baking allows the juices to redistribute throughout the meat, keeping it juicy and tender. If you dive in right away, you risk losing all those flavorful juices onto your plate—no one wants a dry chicken tender!
❄️ Can I freeze these chicken tenders for later?
Absolutely! You can freeze cooked Crack Chicken Tenders for up to 3 months. To do this:
- Allow them to cool completely.
- Place them in a single layer on a baking sheet and freeze until solid (about 1-2 hours).
- Transfer to a freezer-safe bag or container, removing as much air as possible.
To reheat, bake straight from frozen at 400°F (200°C) for about 25-30 minutes, or until heated through.
🌾 Can I make these chicken tenders gluten-free?
Yes! To make gluten-free Crack Chicken Tenders, simply substitute the panko breadcrumbs with gluten-free breadcrumbs or crushed gluten-free crackers. Make sure your ranch seasoning mix is also labeled gluten-free. This way, you can enjoy crispy and crunchy chicken tenders without any worries!
🧀 What can I use instead of cheddar cheese?
If cheddar isn’t your thing, there are several delicious alternatives! You could try:
- Mozzarella for a milder flavor and stretchy texture
- Parmesan for a sharper kick
- Pepper Jack if you want something spicy
Just keep in mind that different cheeses may slightly alter the flavor profile of your chicken tenders but will still deliver that delicious crunch!
🔍 Why do I need to use panko breadcrumbs instead of regular breadcrumbs?
Panko breadcrumbs are key to achieving that coveted extra crunch! Their larger flakes create more surface area compared to regular breadcrumbs, resulting in a crispier coating when baked. I’ve tested this recipe with both types, and trust me — panko wins every time! If you’ve got some on hand, don’t even think about using anything else.
💡 Can I add other seasonings or spices to the coating?
Definitely! Feel free to customize your coating mixture. Adding spices like garlic powder, paprika, or even cayenne pepper can elevate the flavor profile of your Crack Chicken Tenders. Just remember not to overpower it—balance is key. I often play around with flavors based on what I’m craving that day; it’s part of the fun!
Troubleshooting
I will continue to add more to this Troubleshooting section as I start seeing questions coming through from people who have made the recipe.
Troubleshooting tips
“My chicken tenders came out too dry! 😭”
- You may have overcooked the chicken. Baking for longer than 20 minutes, especially if your tenders are thin, can lead to dry meat.
- The internal temperature of the chicken is crucial; make sure to remove them from the oven once they reach 165°F (75°C).
I bet they were still YUM though!
“My coating didn’t stick properly! 🤔”
- If you didn’t let the excess egg mixture drip off before coating, it can lead to a soggy base that prevents the breadcrumbs from adhering well.
- Alternatively, not pressing the breadcrumb mixture onto the tenders firmly enough can also cause it to fall off during baking.
I bet they were still YUM though!
“The coating turned out too dark and burnt! 🔥”
- This could happen if your oven runs hot or if you placed the chicken tenders too close to the heating element.
- Using dark-colored baking sheets can also absorb more heat and cause uneven browning. Keep an eye on them and adjust baking times accordingly next time!
I bet they were still YUM though!
“My chicken tenders are flat and misshapen! 😬”
- If your chicken tenders are not uniform in size, thinner pieces will cook faster and may flatten out while baking.
- Make sure your tenders are of similar thickness, about 1/2 inch thick, for even cooking and a better appearance.
I bet they were still YUM though!
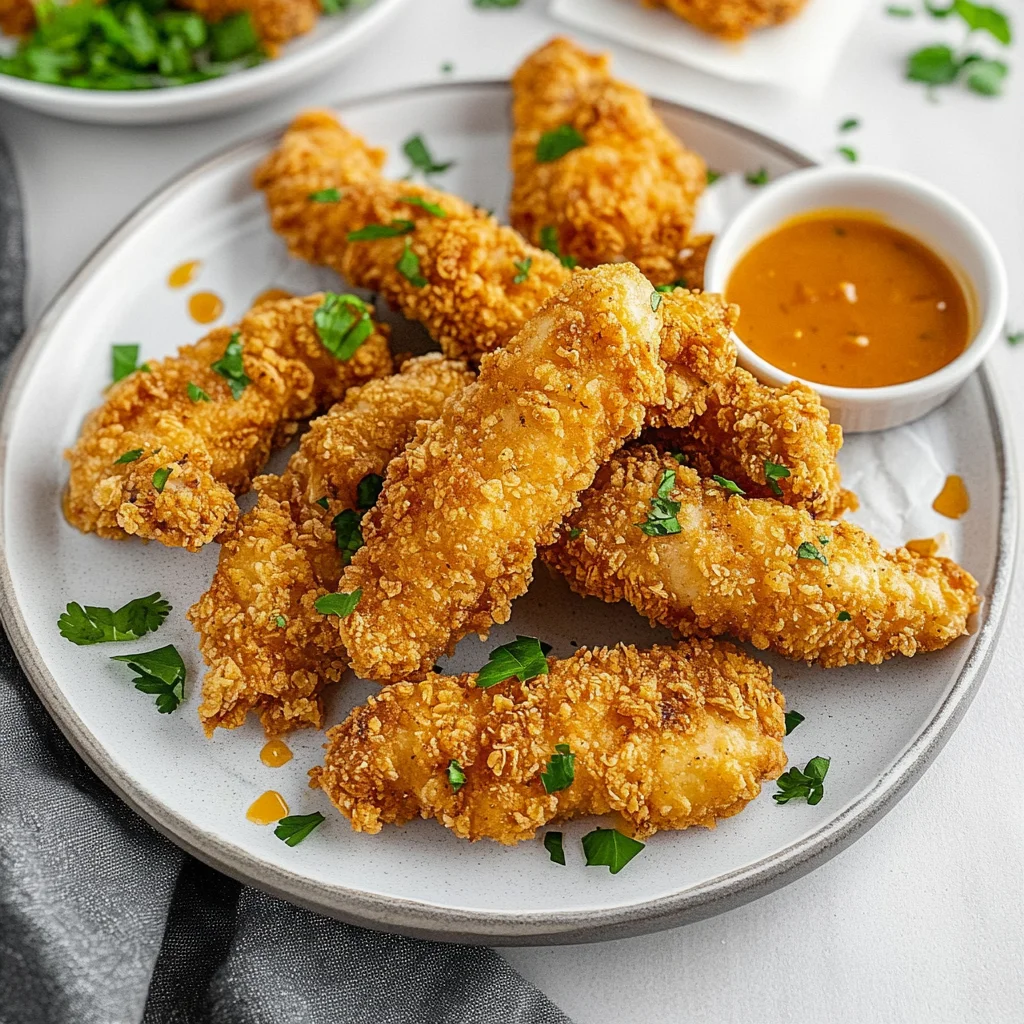
Crack Chicken Tenders
Ingredients
Method
- Preheat your oven to 400°F (200°C). Line a baking sheet with parchment paper.
- In a mixing bowl, combine panko breadcrumbs, shredded cheddar cheese, and ranch seasoning mix.
- In another bowl, whisk together the eggs and milk.
- Dip each chicken tender into the egg mixture, allowing excess to drip off, then coat in the breadcrumb mixture.
- Place the coated chicken tenders on the prepared baking sheet. Drizzle with olive oil.
- Bake in the preheated oven for 20 minutes, or until the chicken is cooked through and the coating is golden brown.
- Use a meat thermometer to ensure the internal temperature of the chicken reaches 165°F (75°C).
- Remove from the oven and let cool for a few minutes before serving.
- Enjoy with your favorite dipping sauce!
Leave a Comment