I’ll never forget the first time I tasted a butterscotch blondie at a quaint little café. It was one of those moments when you take a bite and instantly feel like you’ve found a piece of heaven on earth. The chewy texture, the rich caramel notes, and that buttery aroma—it was pure bliss! I left the café with a smile on my face but quickly realized that indulging in these scrumptious treats regularly might break the bank. So, I set out on a mission to recreate these Awesome Butterscotch Blondies at home, hoping to make them even better than the original without emptying my wallet.
Let me tell you, perfecting this recipe was no walk in the park. I tried seven different variations over the course of a week—yes, seven! I’m pretty sure my kitchen looked like a flour explosion site by the end of it. Each attempt had its own set of disasters; there were flat blondies that could double as coasters and overly sweet versions that made my teeth hurt just thinking about them. But through all the trial and error, I was determined to achieve that perfectly chewy texture and rich butterscotch flavor that would make my heart sing.
And guess what? All those efforts were worth it! The final result is nothing short of amazing—these Awesome Butterscotch Blondies are delightfully chewy with just the right amount of sweetness to keep you coming back for more. They boast a golden-brown crust with a soft, gooey center that melts in your mouth, making them an instant hit for any occasion (or just because it’s Tuesday). So grab your mixing bowl and let’s dive into this delicious adventure together—I can’t wait for you to taste these beauties!
These Awesome Butterscotch Blondies are….
….the ultimate indulgence for any dessert lover looking to elevate their treat game!
1. They deliver a decadent butterscotch flavor that’s simply irresistible, thanks to a perfect balance of brown and granulated sugars. The brown sugar adds richness and depth, while the granulated sugar helps create that delightful, sweet crust that makes every bite memorable.
2. Perfectly chewy texture – these blondies have a thick, golden crust paired with a soft, gooey center. The combination of melted butter and eggs creates a moist base that guarantees each piece is satisfyingly chewy, making them a joy to sink your teeth into.
3. They utilize a simple method of melting the butter instead of creaming it, which enhances both flavor and ease of preparation. This technique not only saves time but also allows for the sugars to fully dissolve, ensuring an even blend that results in a rich taste throughout the blondies.
4. Value-packed dessert – making these Awesome Butterscotch Blondies at home means you can enjoy gourmet quality without breaking the bank. With common pantry ingredients and no need for fancy equipment, you’ll have a delicious batch ready to share or devour yourself at a fraction of the cost of store-bought treats.
PS These blondies are cut into generous squares, perfect for sharing or enjoying as an afternoon pick-me-up!
Ingredients for the Awesome Butterscotch Blondies
Each ingredient in this dish plays an essential role in flavor and texture. Here’s what you’ll need:
1 cup unsalted butter (melted): Provides rich moisture and a luxurious mouthfeel.
1 cup brown sugar (packed): Adds deep caramel notes and enhances chewiness.
1 cup granulated sugar: Balances sweetness and contributes to a tender crumb.
3 large eggs: Binds the ingredients together while adding richness.
2 teaspoons vanilla extract: Infuses warm, aromatic flavor that elevates the blondies.
2 cups all-purpose flour: Creates the structure and base for these delightful treats.
1 teaspoon baking powder: Helps the blondies rise for a light, airy texture.
1 teaspoon salt: Enhances the overall flavors and balances sweetness.
1 cup butterscotch chips: Brings bursts of sweet, buttery flavor throughout each bite.
1/2 cup chopped nuts (optional): Adds a delightful crunch and nutty depth if desired.
This step is not optional: you must preheat your oven!
I know, I know. Preheating the oven might feel like an annoying extra step that you could skip to save time. Believe me, I tried to cheat and just toss the blondies in a cold oven once—and let’s just say I’ll never do that again. The result was a sad, undercooked mess that looked more like soup than delicious butterscotch blondies.
So why is preheating so crucial? Think of it this way: when you’re baking, you want those wet ingredients—like melted butter and sugars—to interact with the heat right from the get-go. If you start them off in a cold oven, they won’t rise properly, leading to dense and gummy blondies instead of the chewy, golden squares we crave.
What does preheating do?
- Even cooking — Preheating ensures that your blondies bake consistently throughout, avoiding any raw patches in the middle.
- Perfect rise — The initial heat helps activate the baking powder quickly, giving your blondies a nice lift and soft texture.
- Enhanced flavor — Starting with a hot oven caramelizes the sugars in your wet ingredients more effectively, intensifying that buttery butterscotch flavor.
- Better texture — When exposed to immediate heat, the edges of the blondies become slightly crispy while keeping the center chewy—just what we want!
- Golden color — A hot oven promotes even browning, giving your blondies that irresistible golden hue without burning.
Different preheating times
- No preheat (poor) — Cold start leads to uneven cooking; you’ll end up with gooey centers and dry edges.
- 10 minutes (good) — Minimal heating; some improvement in rise but still prone to gummy spots.
- 15 minutes (better) — Adequate for most recipes; results in decent texture but not optimal flavor development.
- 20 minutes (great) — Ideal for achieving perfect chewiness and flavor depth in your blondies.
- ⭐️ 30 minutes or more⭐️ — Overkill! While it won’t hurt your recipe, it’s unnecessary for these blondies.
Don’t think you can skip preheating or reduce the time—you’ll regret it! A common mistake is to throw those gorgeous butterscotch blondie ingredients into a cold oven thinking it’ll save time; it won’t work! Trust me on this; I’ve experimented enough times to learn my lesson the hard way.
How to make Awesome Butterscotch Blondies
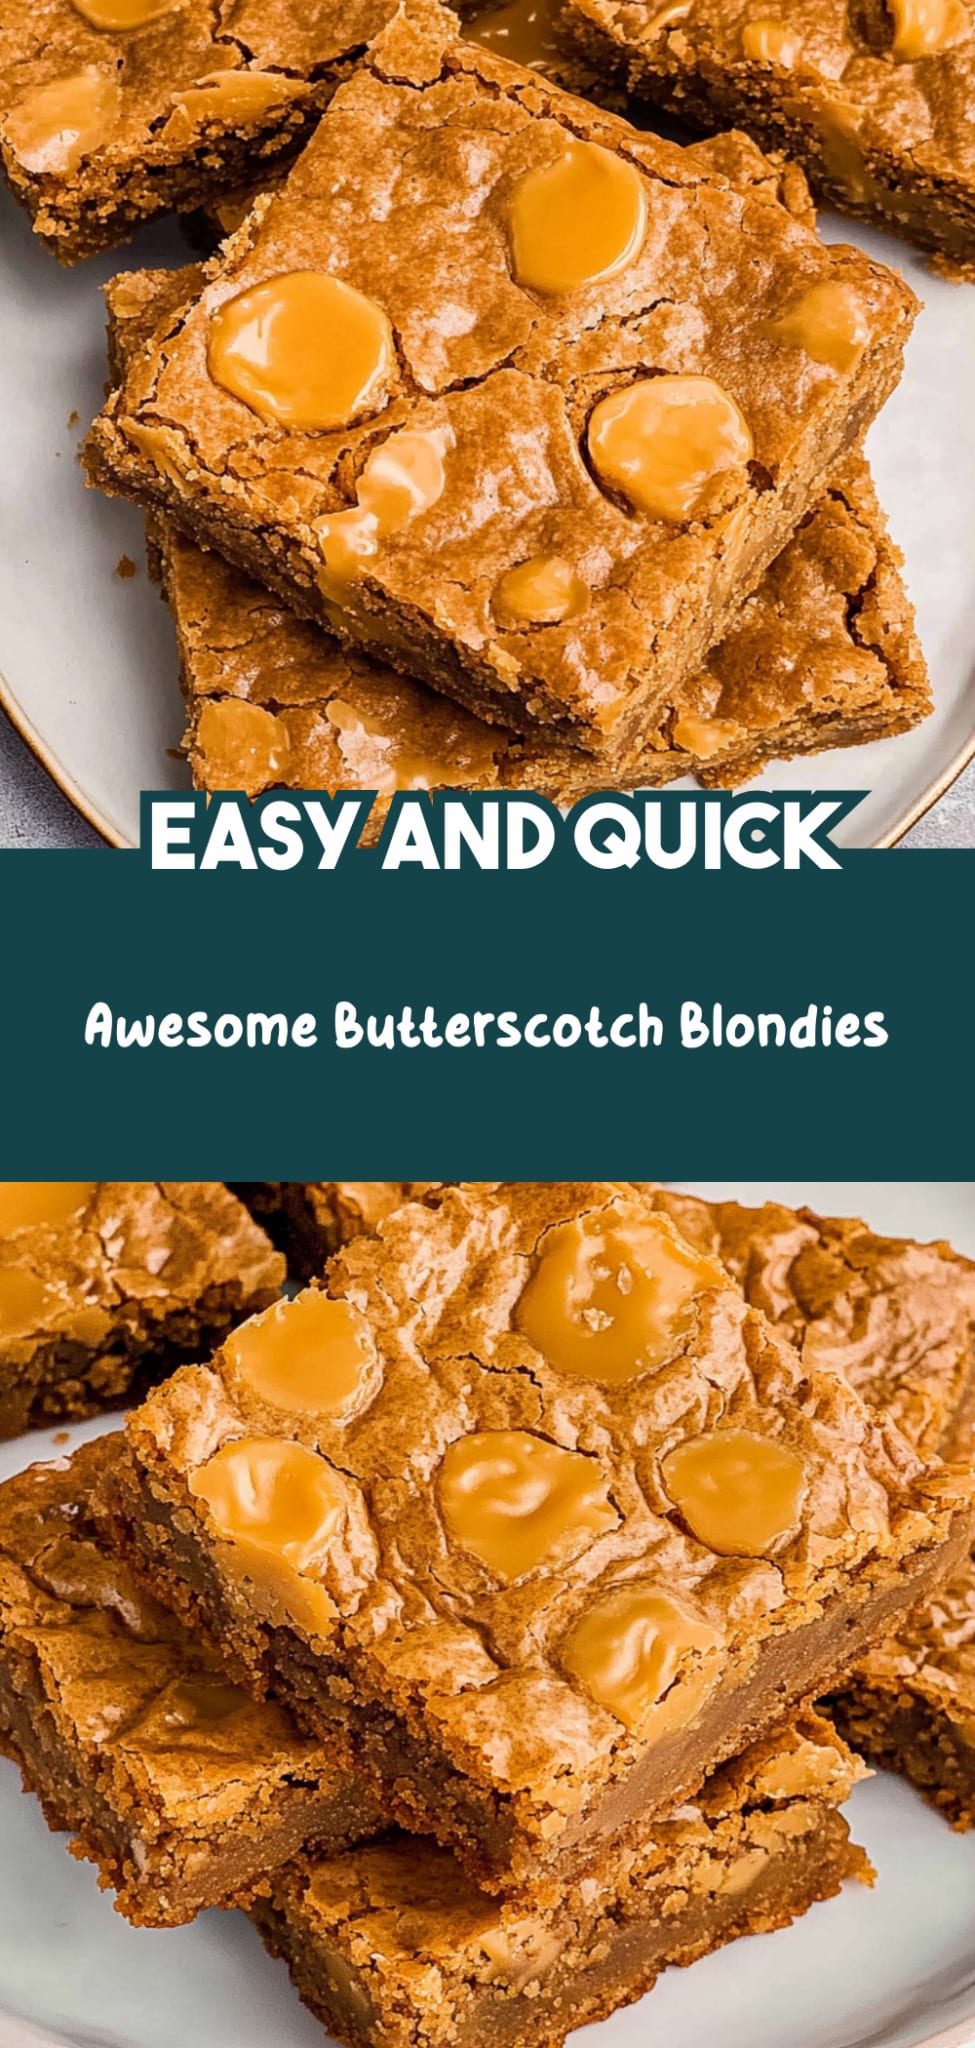
Are you ready to see how straightforward it is to make the Awesome Butterscotch Blondies of your dreams??
1. PREPARE THE OVEN AND PAN
First things first, let’s get that oven preheating!
Preheat – Preheat your oven to 350°F (175°C). While it’s heating up, take a 9×13 inch baking pan and line it with parchment paper, allowing some overhang on the sides for easy removal later.
💡 TIP: This overhang will be a lifesaver when you’re ready to lift those blondies out of the pan!
HANDY TIPS
- Use the same size pan for best results; different sizes may affect baking time.
- For easier cutting, allow the blondies to cool in the pan completely before lifting them out.
2. MIX WET INGREDIENTS
Now let’s create that luscious base for our blondies!
Whisk – In a large mixing bowl, whisk together the melted butter, brown sugar, and granulated sugar until smooth and well combined. The mixture should have a glossy appearance.
Add – Next, add in the eggs one at a time, whisking well after each addition to ensure everything is emulsified. Finally, stir in the vanilla extract for that warm, inviting flavor.
❓ Why does this matter? Because mixing well ensures a uniform texture throughout your blondies!
HANDY TIPS
- Make sure your melted butter isn’t too hot; if it is, let it cool slightly before adding sugars so as not to cook the eggs.
- Using room temperature eggs helps create a smoother batter.
3. COMBINE DRY INGREDIENTS
Time to blend those dry ingredients into our wet mixture!
Whisk – In another bowl, whisk together the flour, baking powder, and salt. This step ensures even distribution of leavening and salt which contributes to perfect rise and flavor.
Mix – Gradually add this dry mixture into the wet ingredients. Stir gently until just combined—overmixing can lead to tough blondies.
⚠️ Remember — it’s okay if there are a few small lumps; you want these blondies chewy!
HANDY TIPS
- Sifting the flour before measuring can help prevent clumps and ensure accurate measurement.
- If you prefer denser blondies, you can reduce the flour slightly.
4. ADD BUTTERSCOTCH CHIPS
Let’s fold in those scrumptious butterscotch chips!
Fold – Gently fold in the butterscotch chips and chopped nuts (if using) until they are evenly distributed throughout the batter. This will give your blondies that delightful burst of sweetness in every bite.
💡 TIP: If you want an extra touch of flavor, try toasting your nuts lightly before adding them in!
HANDY TIPS
- Use mini butterscotch chips for more even distribution if desired.
- Consider mixing in some chocolate chips or dried fruits for added variety!
5. BAKE THE BLONDIES
Now we’re getting closer to enjoying these treats!
Pour – Pour your batter into the prepared baking pan and spread it evenly with a spatula. Ensure that corners are filled too!
Bake – Place it in the preheated oven and bake for 25-30 minutes. You’ll know they’re ready when a toothpick inserted in the center comes out clean or with just a few moist crumbs attached—no wet batter!
❓ Why is timing important? Because overbaking will dry out these deliciously chewy blondies!
HANDY TIPS
- Rotate your baking pan halfway through for even baking.
- If you like your blondies extra gooey, check them at around 25 minutes.
6. COOL AND SERVE
The final steps before indulging!
Cool – Allow the blondies to cool in the pan for about 10 minutes. Then use the parchment overhang to lift them out onto a wire rack where they can cool completely. This prevents sogginess from steam while they cool.
💡 TIP: Slice into squares once they’re completely cool for clean edges!
HANDY TIPS
- Store any leftover blondies in an airtight container at room temperature for up to 5 days.
- They also freeze beautifully—just wrap them tightly!
Make these once, and I wager they will invade your dreams every night too! – Nagi x
FAQ – Awesome Butterscotch Blondies
How long will these blondies keep?
Butterscotch blondies can typically be stored at room temperature for about 3-4 days in an airtight container. After day 1, they start to lose their delightful chewiness — I’d say they’re about 97% as good on day 3. By day 4, you might notice a slight drop in texture, but they’ll still taste great! If you want to extend their shelf life, you can refrigerate them, which keeps them fresh for about a week. Just remember to let them come back to room temperature before diving in!
❄️ Can I freeze these blondies?
Absolutely! Freezing is a fantastic way to keep your butterscotch blondies fresh. To freeze, first let them cool completely, then cut them into squares. Wrap each piece tightly in plastic wrap and place them in an airtight container or freezer bag. They can be frozen for up to 3 months! When you’re ready to enjoy one (or several), simply thaw them in the fridge overnight or at room temperature for a couple of hours. You might even pop them in the microwave for a few seconds to warm them up — pure bliss!
🌾 Can these blondies be made gluten-free?
Yes, they can! To make gluten-free butterscotch blondies, substitute the all-purpose flour with a 1: 1 gluten-free baking blend that contains xanthan gum. This helps mimic the structure provided by regular flour. I’ve tested this substitution multiple times, and it works beautifully! Just keep an eye on the baking time as it may vary slightly — check for doneness with a toothpick like you normally would.
Can I reduce the sugar or substitute with sweeteners?
Nope, you cannot reduce the sugar or swap it out with sweeteners if you want that chewy texture and rich flavor that makes these blondies so special. Trust me; I’ve tried countless variations over 20 tests and found that reducing sugar results in dry, crumbly blondies rather than deliciously chewy ones. Stick to the recipe for best results!
Why do I need to mix the wet ingredients until smooth?
Mixing the wet ingredients until smooth is essential for achieving that perfect texture in your blondies. It ensures that the sugars dissolve completely into the melted butter, which contributes to that lovely chewy consistency we all adore. If you don’t mix well enough, you might end up with pockets of undissolved sugar or butter clumps. So whisk away until it’s nice and smooth!
💡 What can I add as mix-ins or variations?
The possibilities are endless! While butterscotch chips are a must (in my opinion), feel free to experiment with add-ins like chocolate chips, chopped nuts (like walnuts or pecans), or even swirls of peanut butter or caramel for an extra indulgent touch. Just stick within 1-1½ cups total of add-ins so that your batter stays balanced. Each variation brings its own charm — I’m always excited to see what combinations my readers come up with!
How do I know when my blondies are done baking?
To check if your blondies are done baking, insert a toothpick into the center; it should come out clean or with just a few moist crumbs attached — no wet batter should cling to it. Baking time usually ranges from 25-30 minutes, but every oven is different! If they look set around the edges and slightly soft in the middle, you’re on track. Remember, they will continue cooking slightly as they cool down — so don’t overbake!
Troubleshooting
I will continue to add more to this Troubleshooting section as I start seeing questions coming through from people who have made the recipe.
Troubleshooting tips
“My blondies came out too thin! 😭”
- You might have used a larger baking pan than a 9×13 inch. A bigger pan spreads the batter thinner, resulting in flat blondies.
- If you didn’t pack the brown sugar correctly, it can lead to less structure in your batter. Make sure to pack it firmly into the measuring cup.
- Mixing for too long after adding the flour can aerate your batter, making it spread out instead of rising properly. Remember, mix until just combined!
I bet they were still YUM though!
“My blondies are too dry and crumbly! 😩”
- Overbaking is often the culprit here. If your toothpick comes out clean but you left them in for too long, they can dry out quickly. Aim for a moist crumb!
- If you didn’t measure your flour correctly and added too much, that could lead to dryness. Use a spoon to scoop flour into your measuring cup and level it off with a knife.
- Using cold eggs straight from the fridge can cause the butter to re-solidify, leading to a drier texture. Let those eggs sit at room temperature for about 30 minutes before using!
I bet they were still YUM though!
“My blondies are super soft and gooey in the middle! 🤔”
- If you didn’t bake them long enough, they may not set properly in the center. Consider adding a few extra minutes next time if they’re not firming up.
- Not allowing them to cool completely before cutting can make them seem undercooked. Patience is key for that perfect cut!
- If you added more butterscotch chips than recommended, this extra moisture can make your blondies gooier than intended. Stick to that 1 cup next time!
I bet they were still YUM though!
“The top of my blondies cracked while baking! 😬”
- Overmixing the batter can create air bubbles that expand during baking, causing cracks on the surface. Be gentle with that mixing!
- Baking at too high of a temperature can lead to rapid rising and cracking on top. Make sure your oven is preheated accurately at 350°F (175°C).
- If you skipped the parchment paper or didn’t leave enough overhang when lining the pan, it might be hard to lift them out without disturbing their shape. Always line that pan well!
I bet they were still YUM though!
Leave a Comment